Monday, April 30, 2012

Long productive weekend

 This past weekend found me alone at our new home as my wife was off gallivanting around NYC for a bachelorette party.  It left me shorthanded but provided me the ability for some freedom when it comes to design artistic license. 

The projects are in no way in chronological order.  They were all worked on simultaneously.  Most of the pictures were taken with my iphone as i forgot to charge the battery for the camera and it died on me.

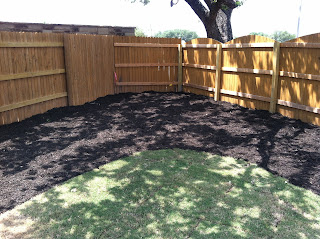
By far the biggest undertaking of the weekend was spreading mulch around the yard.  I have moved substantial amounts of mulch in  my days, however it has always been a multi person operation.  This time I had to operate the wheelbarrow and then spread it as well. 
As soon as the dump truck dropped 13 yards in the driveway, I was overwhelmed.  It was a large intimidating pile and presented a daunting task.  The worst part was that instead of dropping it in the morning on Friday the truck dropped it at 1700.  I immediately set to the task.  I decided that moving all of the mulch into position and then spreading it all at once was the most efficient use of time. 

I think the picture speak for themselves.  It really transforms the yard.  Also you will notice some river rock was spread over the area that is a drainage trouble spot.  Future projects are some planting, construction of a patio, and several other landscaping ideas. 
Left side view from the porch
Right side view from the porch
Construction puppy admiring the new dry creek(not completed)
This will ultimately be a "destination area", complete with a bench and maybe a pergola/arbor

Large yard
Side yard, took artistic license to create beds around existing trees.  Wheelbarrow really beat the yard up.  Picture is taken from the side gate area.  We would like to have a path of some sort leading to the backyard. 

Front yard, new mulch really enhances the "curb appeal"
Furniture was delivered, we intend to add some color maybe a navy blue for accents


The next project that was worked on at various times throughout the weekend was constructing a built-in shelving unit in the master.  I knew that my wife really admired the built-ins that are seen on pinterest and Houzz(a great website if you haven't seen it), so I wanted to do something special for her.  I had this planned before I left, and it was a surprise for her.  I got myself in some trouble because I cleaned her current closet out and brought all of her clothes to the new home to ensure that everything was spaced properly.  This was a problem, like I said she was going to NYC and I inadvertently took some of the outfits she was going to wear.  Whoops.


This is what the closet looked like before.  It was very nice, but nothing special.


With some minor modifications I wrapped the built in around the corner and extended it to the ground.
A second view
Crown molding was wrapped around the top, and a "return" was used on the right side to really separate the built-in from the rest of the closet.  Cove molding was used on the vertical left and right face, and a small chair molding was used on the bottom.
This picture doesn't quite do it justice.  It was painted with the same Behr "ultra pure white" we used on our crown molding.  It really pops out and looks very nice. 
Another project that was fairly simple but had a huge impact.  Our garage was a mess from it being ground zero for most of our projects.  With simple 2"x4"x8' studs and very cheap ($.75 - $2.00) hooks I created a wall storage system.  You can buy pre-made commercial systems by rubbermaid and other companies but this is not only cheaper but it is also only limited in employment possibilities by your imagination.   

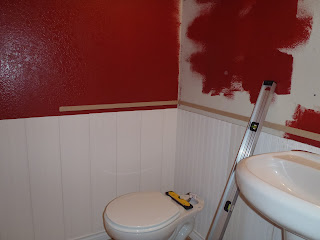
The last project for the weekend was completing the downstairs "powder room".  After looking at the bathroom with the bead board installed I once again used that artistic license that I had due to my temporary Independence and decided to install crown molding.  This crown molding is not the complex three piece variant we installed in the bedroom, but a simple once piece that is most common.  I thought anything more complex would overwhelm the small space. 
Once coat of paint on the walls, crown, and wainscoting.
Finished product(mostly, still deciding if we want to trim the mirror with wood casing.)  Not thrilled with this faucet, it is a bit flimsy and the drain plug handle hits the chair rail.  Removing the existing faucet was a piece of cake, but the drain plug was another story.  I have a lot of respect for plumbers, takes a lot of patience and forearm strength.
I really like the oil rubbed bronze fixtures
Missing a hand towel holder, the supplied anchors were junk and pushed right through the dry wall. 

Long post, but like I said, productive weekend.  Next up is picking up our penske truck on Thursday and moving in.  I don't think we're going to document that as it is not very eventful.  This is our second time moving ourselves, however this one will be much easier as it is a 4 hour move not the 14+ hour move from Savannah, GA to Oklahoma.   

Monday, April 23, 2012

Bead Board continued

Continued from previous post
Installing the chair rail backer was driven completely on caffeine.  Due to the time I needed to return the table saw by I was up very late the night before.

Because the chair rail was going to overlap the bead board it needed to have a backer to allow it to sit flush.

Chair rail installed.  Notice how rough it looks around the sink.

I wanted to leave a space between the sink and the MDF(bead board) so I didn't mind how rough it was in the previous picture.  After some caulking it looks great, and with some paint it will all come together.

All seams caulked and all nail holes spackled.  Next step is paint and we have a great linen white that will give this bathroom a great country feel.

Coming along nicely

Before we even left for our weekend we had a let down.  We received a call from the furniture store asking us to set up a delivery time, which was strange because we were under the assumption that the furniture was being delivered the following morning.  Somewhere there was a miscommunication, long story short our furniture will be delivered this upcoming Saturday.

Once that initially obstacle was overcome we were on our way.  Initially we did not have a clear plan on what our goal for the weekend was going to be.  Friday night was spent unpacking about 700 pounds of our possessions that we moved down (I know the weight because we are required to get it weighed to be compensated).  We also stopped at Home Depot for some supplies as well as HEB.  HEB is a great grocery store in Texas.  It has everything you could ever want, it is going to be a great change of pace from what we are used to in central Oklahoma.

Saturday was a busy day.  Lots of yard work was completed and some paint was put on the wall of the powder room.  The yard is coming along great!  An irrigation system is an amazing convenience and will be greatly appreciated come the summer heat. 

Back Yard, Patio is laid out

Planter Beds around perimeter.  Tons of weeds were pulled.


We quickly found out that a quart of paint does not go as far as you think it does.  So we decided to make another trip to home depot, this time for a gallon. 

While we were there we decided to pull the trigger on a project we were thinking about.
Bead Board Wainscoting for the powder room! 
The old base board was to thin to just allow the bead board to sit on top, so we determined that it needed to be pulled off.  Well, that was easier said than done.  The crew who built our home some how decided it would be a good idea to put the base board in first and then tile up to it, basically wedging the board between the tile and the wall.  This created a problem for us and resulted not only in destroying the base board but also large gaps between the walls and tile.

With some patience, a few swears, and some new base board(much nicer than the builder grade) we were back on track.

The first piece of bead board installed.  Very easy to work with, and after doing a three piece crown molding this was a cake walk.  Biggest thing that made it easier was not having to go up and down a ladder over and over.

The finished pictures will have to wait until the next post as Blogger is not letting me put any more on this post.  TO BE CONTINUED. 


I also took some time to make some improvements to the workbench I had been using.  It needed some shelves and the legs were wobbly.

Thursday, April 19, 2012

Quick Week!

The closer we get to our move, the faster the time seems to be flying by.  It seems like we just got home from our last trip down to our new home, however the Jeep is loaded up once again.  Speaking of the Jeep I spent a few hours on another hobby of mine, car detailing, and did a three stage paint correction.


The Jeep looks amazing.

On the home front this week not all that much was done.  We did purchase a grass trimmer/edger.  It is the craftsman 79117.  It is a 29 cc 4 cycle gas powered trimmer.  It is certainly far more than what we need, however I would rather be over powered than under powered.


Also for a taste of things to come we purchased a 24" natural gas fire pit ring burner.  This burner will be used in a built in fire pit on our patio to be.  This weekend we have a couple of plumbers coming to do an onsite inspection and give estimates for running the gas line to the fire pit. 
A lot of coordination and deconfliction occured this week as well.  We have set up the disconnections for all of our utilities here, as well as internet, phone, and direct TV install at our new home.  Soon enough we will be able to do some real time blogging as our projects are happening, because we know y'all are waiting on the edge of your seats. 

Okay Bruins are coming on.  GO Bs!!!


Monday, April 16, 2012

Productive weekend

Time flies when you're having fun, or when you're painting.  That is what we learned when we finished the first coat of paint on the walls of the master bedroom and glanced at our clock on Friday night.  0345, that can't be right.  But, it was.  Somehow we had managed to get so deep into our work that we lost track of time.  To put that into perspective, we had woken up at 0500 on Friday morning to go to the gym, worked a half day, and then driven 5+ hours to our home.  LONG DAY

It was all worth it though.  Enough with the words and onto some pictures.

So the bedroom began looking like this. 

In itself the bedroom is a very nice room.  However, we wanted to make it our own since it will be one of the rooms we spend the majority of our time in.  We loved the bay window and the tray ceiling and really wanted to showcase both of those.

At this point the bedroom is about 95% complete.  The walls, ceiling and crown have all been hit with two coats.  All that remains to be done is to hang the curtain rods and curtains as well as final touch ups.

Disclaimer: Sorry for the IPhone pics, we forgot our camera.  


We are extremely happy with the results.  The room has been completely transformed.  Our goal was a tranquil space that we could both leave behind the rest of the hectic world and we think we accomplished that.  It was a lot of work, but it was totally worth it.  Before we began we both that this project might be a bit beyond our skill set, but with patience, the right tools, and more patience we were able to do it.
The final touches will be the curtains and curtain rods, and of course furniture. 

The rest of the weekend we completed smaller tasks like mowing and raking our yard, laying out the location for the rest of the sod in the backyard, installing a set of blinds over our patio door, purchasing a faucet for the down stairs powder room, and furniture shopping. 

Sneak peak at our new living room furniture. 
The sofa, love seat, and accent chair pictured above will be the newest addition to our home come this Saturday.  Not pictured is a leather ottoman we also purchased.  We still need to decide on end tables and a coffee table. 

Thursday, April 12, 2012

One day until our next work weekend

We head back down to our new home tomorrow.  To say that we are excited would be an understatement.
Let's Update with our priorities for work and some updates on projects

Last night we made a trip to our local Home Depot and Lowes.  We walked out with lighter wallets, but some supplies to help us on our weekend projects.

Master Bedroom
Our top priority this weekend will be to finish the crown molding and painting our master bedroom.  Shouldn't be to big of a project.  Sand the crown, paint the crown, and then paint the walls and ceiling.  Hanging curtain rods and curtains will be the finishing touches.

Porch
We had our first interaction with our home owners association yesterday. We emailed in our plans for screening in our back porch. Apparently everything on the exterior of your home must be approved by the Architectural committee. We submitted our plans, and we went way overboard compared to what they were asking. I reached back to my days of engineering thesis reports and used Google Sketch a free CAD program to give accurate 3D models of the porch. Although it was overboard it also helped us to visualize the finished product and determine what our building material requirements would be.  I attached some photos below


View from the property line
 2"x4" Stud Framing
 Frame with Balusters
 Screens attached
Final Design to include pet door and stairs

One of the basic tenets of this design is that we wanted the ability to allow our dog outside with little supervision.  However, I want a gorgeous green lawn without dog spots everywhere.  That's where the dog door comes into play.  This door and stairs will lead to a small possibly 6'x6' area that is fenced in.  Thus our dog can have some feeling of freedom to go do her business.  This fenced in area will be somewhat hidden by some strategic landscaping.

Landscaping
The landscaper that installed the sod for the builder went out to our home and measured the remaining area yesterday.  So, I had intended to install 3 pallets of sod, I was very wrong.  We had a little under 5000 sf that remained with zero ground cover.  That is close to 11 total pallets(450 sf per pallet) That is a lot more then I had planned and budgeted for.  However, the ground needs to be covered we're not willing to have a mud pit. I intended to have some planter beds as can be seen below.
That is an accurate depiction of our plat plan.  If I haven't recommended google sketch enough yet, I recommend it.  What a great tool for home owners.  If you have any CAD knowledge it will be simple to pick up, if not google provides tutorials online. 
Back on track, The left perimeter and the rear of the lot I intended to have 5 foot planter beds and then use river rock as edging in a 2 foot bed and then use actual plastic edging to separate the two.  However, the landscape also informed us that right in the middle of the back wall is the area that our property drains towards.  The planters would disrupt the drainage from our yard, causing sitting water which is certainly not what we want.  I'm contemplating still doing the planter beds, but leaving a separation where the yard drains towards.  Then lowering the grade in that area and filling it with the same river rock used as edging.  It would allow the yard to drain as the river rock would allow the water to permeate, and when the yard is dry it would have a cool dry creek effect similar to the photo below.
When we decide which way to go y'all will know because we will proudly post those pictures. 
Speaking of landscaping, we hope our mailbox isn't full of fines from the HOA because we have yet to mow our lawn yet.  We have a solution to that!  Below is a picture of the fiskars stay sharp reel mower.  It is supposed to be the most advanced reel mower available.  We will see how it tackles the task of mowing multiple weeks of growth. 

There are a few more smaller tasks we will try to accomplish this weekend like attaching all the knobs and pulls in the kitchen and choosing a color for the downstairs powder room.  Long post, I know, however it should make up for the lack of posts in the past and be a good preparation for our weekend.